How to: Installing ICS (4.0) on Nexus One.
Since Google released Android 4.0, Nexus One stopped receiving updates and got stucked on 2.3. Developers and users got kind of mad because they didn’t understand how Google was pulling a Nexus away and many ROM cooks started working to get ICS back to this model.
One of the most featured developers on xda-developers is called “texasice” and is one of the very first developers who started porting ICS to Nexus One. Although he had some problems with his phone and had to ask for some donations to keep on working, he released a very clean and succesful ROM ready to install.
I’ll try to show you how to install it, though it’s not really complicated. You have to keep in mind that this process might void your warranty or even brick your phone, so do it on your own risk!
1. Is your phone rooted?
The first step is to root your phone. If it is, skip this step, if it’s not, keep on reading.
The easiest way to get your Nexus One rooted is by using “OneClickRoot” on Windows. It can be downloaded here: http://depositfiles.com/files/n0dcxce3t
Warning: In order to get OneClickRoot to detect your phone correctly, you MUST install Google USB Driver. It can be downloaded here: http://drivers.softpedia.es/descargar-Google-USB-Driver-Revision4-139077.html
Disconnect you Nexus One from the USB Port, install Google USB Drivers, connect it back to the computer and launch OneClickRoot. Click “Root” button and, that’s it! You’ve just rooted your Nexus. Feel free.
2. Installing custom recovery
Next step will provide our phone a new recovery to flash custom ROMs and any other images. The easiest way to get it is by downloading from Google Play “ROM Manager”. It’s absolutelly free, though you can get some awesome features by buying full version.
Once it is installed, we just have to click “Flash ClockworkMod Recovery”, and it will automatically download and flash our new custom recovery.
Notice that it will ask for root privileges during the installation, so click “Yes” when prompted.
3. Flashing custom HBOOT

This step might be the most complicated so, read everything carefully and think twice before doing anything.
The main tool we will be using is called “fastboot” and it usually comes into the Android SDK Pack. I thought it would be kind of a mess asking you to download the full package, so I uploaded a single file for you to download it directly.
Download Fastboot [WIN/OS X/LINUX]: http://cl.ly/1S1R3u1L1j1X02061c2N
Inside you will find fastboot for every operative system, unzip the one that fits you and place it somewhere.
Shut down you Nexus and power it up by holding POWER + VOL DOWN at the same time. You will see a white screen with some green robots. Using VOLUME keys, scroll down to “Fastboot” and click POWER button.
Congrats! You’ve just accesed Fastboot mode on you Nexus. Next step is to use the tool you had downloaded before to order our phone to flash a new HBOOT.
Download HBOOT: http://cl.ly/0q3W39253F1k2X40293W
Download GO35.LOL exploit: http://cl.ly/2C0n2u1X2E1w0h1q3H0N
Now it’s time to use the Terminal.(On Windows open up “cmd”). Navigate to the folder where you unzipped fastboot, and launch the following commands: (Of course, remove “[PATH TO HBOOT]” with the appropiate path.
> fastboot flash hboot [PATH TO HBOOT]> fastboot reboot-bootloader> fastboot -w
Tips:
-On Mac or Linux you might get a permission denied while launching “fastboot” tool, try: chmod +x fastboot
-You might get “FAILED (remote: signature verify fail)” while flashing hboot. To fix it:
> fastboot boot [PATH TO GO35.LOL]> fastboot flash hboot [PATH TO HBOOT]> fastboot reboot-bootloader> fastboot -w
4. Flashing ICS ROM.
Finally, we’ll have to flash our ICS ROM using the custom recovery. Power off your mobile and copy the ROM right into de sdcard.
DOWNLOAD ROM [Evervolv-Perdo-2.2.0a6]: http://goo.gl/mKd70
Once it’s copied on you sdcard, power on your Nexus by holding POWER + VOL DOWN. You should notice the title menu has changed. Scroll with Volume keys to the option: “RECOVERY” and press POWER Button.
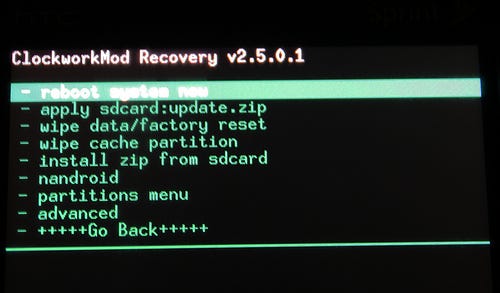
A blue menu with a bunch of options will appear. Use your trackball to select: “Wipe data/factory reset”. Click on “Yes” and wait. Do the same with the option called “Wipe cache partition”.
Now scroll to “Install Zip from sdcard” — “choose zip from sdcard” — And select the .ZIP with the ROM you downloaded before.
It will start installing and flashing your new ROM and when it has finished, you will have to click: “Reboot system now”.
5. Enjoy!
When you reboot your phone, it will launch your all new operative system. Notice that the first time it might take a while to load everything up.
EXTRA: You won’t find Google Apps [Play Store, Google Sync…] installed on this ROM. This is something you will have to flash later.
To instal Google Apps, you have to place this file right into your sdcard:
Google Apps: http://d-h.st/SAk
Launch your phone into Recovery Mode as explained before, get into “Install zip form sdcard”, choose the Google Apps ZIP and follow the installation guide to flash GApps into your ICS ROM.
I hope this guide can be useful for everybody and don’t hesitate to contact me if you’ve got any problem!
